About plastic for drypoint
- Vega Brennan
- Apr 30, 2018
- 3 min read

When I first started making drypoint prints, I tended to use any plastic that was available including the fronts of old noticeboards, CDs and the more rigid plastics used in blister packaging. However, since running the print studio, it has been necessary to source a suitable plastic that will consistently give good results for printmakers.
A plastic for drypoint needs to have these qualities:
Durable so that the burr does not wear away too quickly
Easy to cut to size
Easy to scratch
Transparent
Recyclable
These are the plastics available from commercial suppliers:
ABS, also known as acrylonitrile butadiene styrene, for thermoforming, car parts, usually coloured or black
Polypropylene, used for lightweight corrugated boards (signage), usually coloured, not transparent
HDPE or high-density polyethylene, used for chopping boards, milk bottles, black or white
Polycarbonate, glazing, stronger than acrylic but brittle
PETG, Polyetheylene terepthalate with glycol, used for glazing, signage, able to withstand higher temperatures
Acrylic or polymethyl methylacrylate (Plexiglass, lucite, perspex, Crystallite), glazing, brittle but durable
Acetate, used for OHPs,
HIPS, high impact polystyrene, used for thermoforming, not very strong, not transparent
PVC, extruded polyvinyl chloride, used for blister packaging, comb binding covers,
CAB, cellulose acetate butyrate (Uvex), used for thermoforming
PET or polyetheylene terepthalate, thermoforming, plastic bottles,
BOPET, biaxially oriented polyester film (BOPET) used for stencil cutting
I requested samples of polycarbonate, acrylic and PETG from a local supplier and tested them by scratching with a sharp point and then printed the plates using the etching press, Caligo Carbon Black etching ink and 250gsm Clairefontaine paper.
Both the polycarbonate and acrylic sheets were quite brittle and difficult to scratch and as a result the burr wore away quickly after about 5 prints. I liked the quality of the line as which ended up being quite angular and sketchy. It was responsive to light pressure and it was easy to create a range of tones.

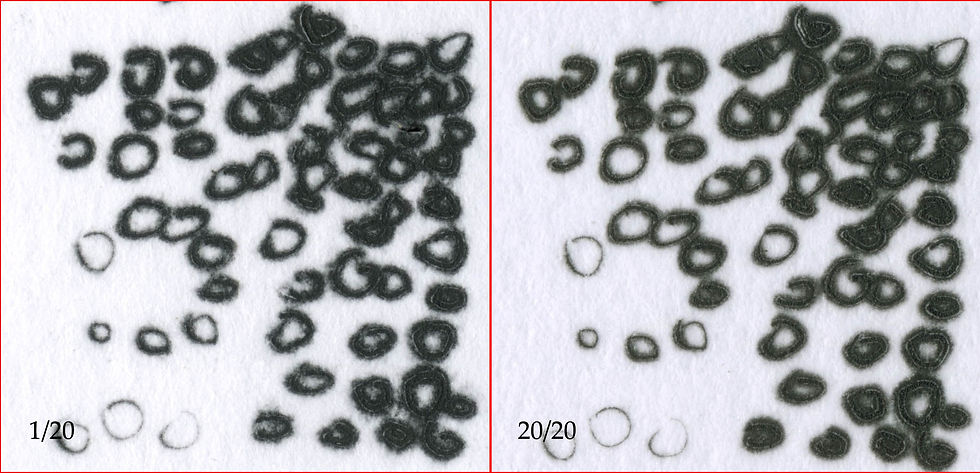
Fig 1. Drypoint test plate on PETG: actual size 70 x 115mm, 1/20
The PETG felt waxier and was a little more slippery to scratch but the burr was more durable and I was able to get at least 20 prints from the one plate. Lines tend to be more positive and stronger than acrylic or polycarbonate. When printing, the PETG registered very fine lines and scratches so it is important to wipe very carefully, using only tissue paper as flat sheets as I found that even the usual phone book pages will scratch the surface of the plate.

Fig 2. Drypoint detail: actual size 20 x 20mm, hardly any sign of wear on plate, slightly crisper image on right due to less damp paper
PET and PVC are also possibilities as they are similar in density and softness to PETG but these are not often available from commercial suppliers. PETG is fully recyclable and you can put it in normal recycling (make sure it is clean first).
To conclude, PETG is the best plastic to use for drypoint, especially as it is available in different thicknesses. At thicknesses such as 0.7mm it can be cut easily with a blade or even scissors, but there is still a good plate mark. To get a straight line, score repeatedly with a blade and steel ruler and then snap along the sharp edge of board or table. You may need to cut through the protective film as well afterwards with a blade.
CDs
To turn a CD into a drypoint plate, it is possible to remove the foil surface by making a single radial scratch on the surface with a blade and then covering it with parcel tape and peeling off. Some CDs are easier to do this to than others.
Health and safety
Be careful about plastic particles when using machines such as jigsaws and mechanical engraving tools as particles can present health risks as well as being detrimental to the environment. Use a dust-mask, goggles and gloves. Use a damp cloth to sweep up dust, seal in a bag and dispose of in the normal way. Some plastics have been known to heat up under pressure so test your materials gently at first and if necessary seek advice from your supplier. Using electric tools such as mechanical engravers or soldering irons (I sometimes use these to get interesting marks) tend to melt the plastic and will give off fumes that are noxious or even toxic. Make sure you work in a well-ventilated space if using such tools. Cut edges can also be sharp so be careful when handling large sheets, wear gloves and sturdy shoes.
